
The Ultimate Guide to Indoor Plant Repotting: Refresh Your Green Companions
Indoor plants bring life, beauty, and a touch of nature to our living spaces. Over time, as our plant babies grow and thrive, they may outgrow their current pots, necessitating repotting. Repotting is a crucial step in ensuring the health and vitality of your indoor plants. In this comprehensive guide, we’ll walk you through the art of indoor plant repotting, sharing tips, techniques, and expert advice to help you successfully refresh your green companions.
Why Repotting Matters
Repotting is more than just transferring your plants to a larger container. It provides numerous benefits, including:
🌿 Enhanced Growth: Repotting allows your plants to spread their roots and access fresh nutrients, promoting healthier and more vigorous growth.
🌿 Improved Drainage: Over time, soil in pots can become compacted, hindering proper drainage. Repotting gives you the opportunity to refresh the soil, ensuring adequate drainage and preventing root rot.
🌿 Increased Nutrient Availability: Fresh potting mix provides essential nutrients that can be depleted over time. Repotting replenishes these nutrients, revitalizing your plants.
Signs It’s Time to Repot
Recognizing when your plants need repotting is crucial. Look out for these signs:
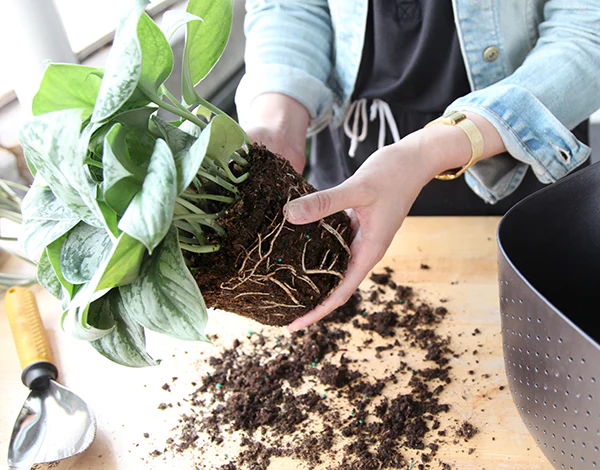
✨ Root Bound: If the roots are tightly packed and circling around the root ball, it’s a clear indication that your plant needs more space.

✨ Waterlogged Soil: Frequent overwatering can lead to compacted soil, poor drainage, and root suffocation. If the soil remains excessively moist even after adjusting your watering habits, repotting might be necessary.
✨ Stunted Growth: Plants that have stopped growing or show signs of decline despite proper care may be signaling their need for repotting.
The Right Time to Repot
Spring is generally the ideal time for repotting, as plants enter their active growth phase. However, if your plant shows urgent signs of distress, such as root-bound conditions or severe root rot, repotting should be done immediately, regardless of the season.
Steps to Successful Repotting

🌱 Choose the Right Pot: Select a pot that is 3 – 6 cm larger in diameter than the current one, with proper drainage holes. Ensure the new pot matches the aesthetic of your space.
🌱 Gather the Essentials: Prepare fresh potting mix, a trowel, gloves, and a watering can.
🌱 Gentle Removal: Carefully remove the plant from its current pot, gently loosening the root ball to avoid damage.
🌱 Inspect and Prune: Examine the roots, trimming away any damaged, diseased, or excessively long roots. Pruning encourages new growth.
🌱 Prepare the New Pot: Fill the new pot with fresh potting mix, leaving enough space for the root ball to settle comfortably.
🌱 Repot with Care: Place the plant in the new pot, ensuring it sits at the same depth as before. Fill in the gaps with potting mix, gently firming it around the roots.
🌱Post-Repotting Care: Water your newly re-potted plant thoroughly and place it in an appropriate location, considering its light and humidity requirements.
Post-Repotting Tips
🌱 Gradual Adjustment: After repotting, allow your plant some time to acclimate to its new surroundings. Avoid fertilizing for a few weeks to minimize stress.
🌱 Monitoring and Maintenance: Keep a close eye on your repotted plants, adjusting watering and lighting as needed. Observe new growth and assess if further repotting is necessary in the future.
Conclusion
Repotting is a vital aspect of indoor plant care, ensuring your green companions continue to flourish and thrive. By understanding the signs, timing, and proper techniques, you can confidently embark on the repotting journey, providing your plants with the space, nutrients, and environment they need to reach their full potential. So, grab your gardening gloves, a fresh potting mix, and give your indoor plants the refreshing makeover they deserve!
 @urbanrootsnz
